
ChatGPT is an incredibly powerful tool for generating human-like responses to natural language queries. It uses a state-of-the-art AI language model, GPT, to understand and respond to text inputs in a conversational manner. However, one drawback of using ChatGPT is that it is not an open-source tool. This can cause some concern if you worry about your data being leaked.
Fortunately, it is possible to build your own local “ChatGPT”! In this step-by-step guide, I will show you how to do so, by finetuning an open-source model and using public data.

LLama has been recently introduced by Meta. It is a large language model and it exists in different versions, depending on the number of parameters of the model: 7B, 13B, 33B, and 65B parameters. We will use the first version (7 billion parameters). It is more than enough to get very good results. With some additional tricks, you will see that you can easily fit this into your computer, or into Google Colab!
What exactly is LLaMA?
To make it simple, it has been trained by Meta to predict, when some text is given as input, what comes next. The idea is to finetune this model so that it can provide an answer to some instructions and inputs.
How can you have access to LLaMa?
Well, the model was not designed to be open-source! But it turns out that it has leaked and you can now find it pretty much everywhere. For example, you can find it on huggingface, right here.
Great! Now let’s explain the tools we will use to optimize the finetuning of this large model.
LoRA is the key to building your own ChatGPT-like model! LoRA stands for Low-Rank Approximation. Okay… you might wonder what that means.
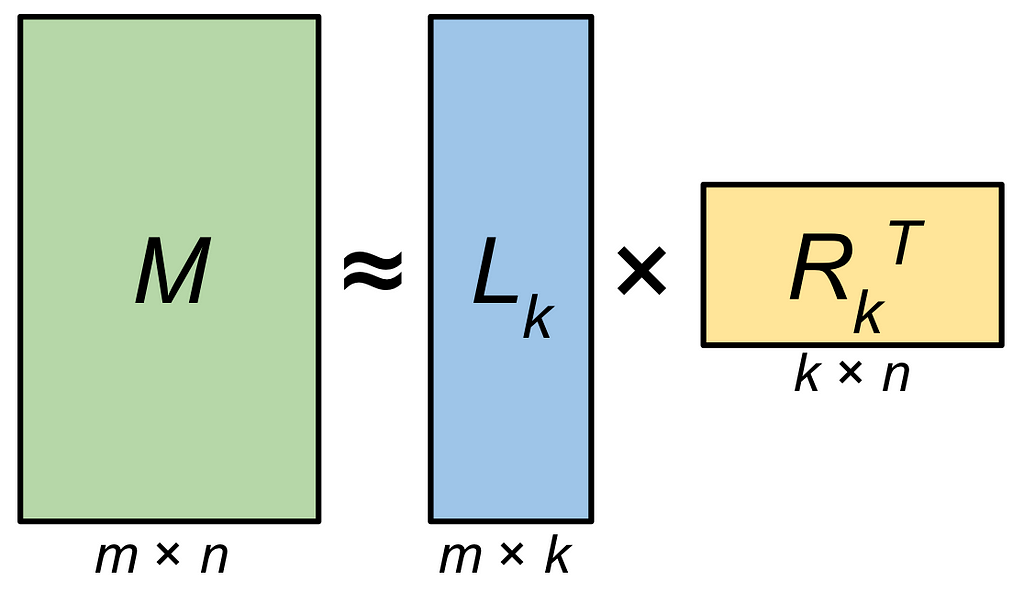
During finetuning, weights are updated. The idea is to approximate the weights matrix M by eliminating some parameters. Well, we could remove random parameters, right? Absolutely, it is a good first step. But LoRA is doing more than that. Intuitively, the goal is to select the most important parameters! The low-rank approximation matrix is a simplified version of the original matrix that captures the most important information while discarding some of the less important details. If you are familiar with linear algebra, this is nothing but keeping the largest singular values of the matrix in its SVD. By doing this, we can drastically reduce the number of parameters and speed up the finetuning and inference process!
Finally, we can use int8 quantization. That means reducing the precision of a neural network’s parameters from 32-bit floating-point numbers (FP32) to 8-bit integers.
We can then combine both LoRA and quantization to further optimize memory usage and speed up finetuning and inference. These two steps are fundamental.
We are ready to start coding our own ChatBot. To finetune the LLaMA model, we’ll use 52K samples of data, which you can find right here. It contains instructions, input (optional), and output (I recommend you check the file to see what it looks like). Of course, you can choose whatever file you want, depending on your needs!
First, let’s install everything we need, you can install this locally in a new environment, or in google colab. I personally did it in Google Colab but it’s exactly the same locally! To do so, instead of cloning the alpaca-lora repository like below, you can directly download the alpaca_data.json and drop it into your local repository.
Note: if you use Google Colab, don’t forget to use the provided GPU!
git clone https://github.com/tloen/alpaca-lora.git
%cd alpaca-lora/

!pip install -q datasets loralib sentencepiece
!pip uninstall transformers
!pip install -q git+https://github.com/zphang/transformers@c3dc391
!pip install -q git+https://github.com/huggingface/peft.git
!pip install snscrape
Let’s import the packages we need:
import os
import torch
import torch.nn as nn
import bitsandbytes as bnb
from datasets import load_dataset
import transformers
from transformers import AutoTokenizer, AutoConfig, LLaMAForCausalLM, LLaMATokenizer
from peft import prepare_model_for_int8_training, LoraConfig, get_peft_model, PeftModel
We can now define our hyperparameters (you can of course adapt these) and load the LLaMA model. Then, we define the configuration for the LoRA transformation, using the PEFT library.
MICRO_BATCH_SIZE = 8
BATCH_SIZE = 128
GRADIENT_ACCUMULATION_STEPS = BATCH_SIZE // MICRO_BATCH_SIZE
EPOCHS = 3 #
LEARNING_RATE = 2e-5
CUTOFF_LEN = 256
LORA_R = 4  # the number of singular values to keep for LoRA
LORA_ALPHA = 16
LORA_DROPOUT = 0.05
model = LLaMAForCausalLM.from_pretrained(
    "decapoda-research/llama-7b-hf",
    load_in_8bit=True,
    device_map="auto",
)
tokenizer = LLaMATokenizer.from_pretrained(
    "decapoda-research/llama-7b-hf", add_eos_token=True
)

model = prepare_model_for_int8_training(model)

config = LoraConfig(
    r=LORA_R,
    lora_alpha=LORA_ALPHA,
    target_modules=["q_proj", "v_proj"],
    lora_dropout=LORA_DROPOUT,
    bias="none",
    task_type="CAUSAL_LM",
)
model = get_peft_model(model, config)
tokenizer.pad_token_id = 0  # unk. we want this to be different from the eos token
data = load_dataset("json", data_files="alpaca_data.json")
Great! Now, let’s load the data and finetune our model. The generate_prompt function processes every sample of the dataset we have in order to return a single text as a string. You can adapt this function depending on the data you want to use to finetune the model.
def generate_prompt(data_point):
    if data_point["input"]:
        return f"""Below is an instruction that describes a task, paired with an input that provides further context. Write a response that appropriately completes the request.
  ### Instruction:
  {data_point["instruction"]}
  ### Input:
  {data_point["input"]}
  ### Response:
  {data_point["output"]}"""

    else:
        return f"""Below is an instruction that describes a task. Write a response that appropriately completes the request.
### Instruction:
{data_point["instruction"]}
### Response:
{data_point["output"]}"""


data = data.shuffle().map(
    lambda data_point: tokenizer(
        generate_prompt(data_point),
        truncation=True,
        max_length=CUTOFF_LEN,
        padding="max_length",
    )
)

trainer = transformers.Trainer(
    model=model,
    train_dataset=data["train"],
    args=transformers.TrainingArguments(
        per_device_train_batch_size=MICRO_BATCH_SIZE,
        gradient_accumulation_steps=GRADIENT_ACCUMULATION_STEPS,
        warmup_steps=100,
        num_train_epochs=EPOCHS,
        learning_rate=LEARNING_RATE,
        fp16=True,
        logging_steps=1,
        output_dir="your_directory",
        save_total_limit=3,
    ),
    data_collator=transformers.DataCollatorForLanguageModeling(tokenizer, mlm=False),
)
model.config.use_cache = False
trainer.train(resume_from_checkpoint=False)

model.save_pretrained("your_directory")
The training might take some time. With Google Colab Pro, it took approximately 3 hours for 2 epochs. It can seem very long but we don’t need too many epochs. We already have very good results with 2 or 3 epochs as you will see!
Note: you can push the model on your huggingface hub to load it whenever you need.
from huggingface_hub import notebook_login

notebook_login()
model.push_to_hub("your_username/your_model_name", use_auth_token=True)
model.save_pretrained("your_username/your_model_name", use_auth_token=True)
Then, you can directly load your model with:
tokenizer = LLaMATokenizer.from_pretrained("decapoda-research/llama-7b-hf")
model = LLaMAForCausalLM.from_pretrained(
    "decapoda-research/llama-7b-hf",
    load_in_8bit=True,
    device_map="auto",
)
model = PeftModel.from_pretrained(model, "your_username/your_model_name")
Let’s try our new model. The inference function takes as input an instruction and the optional input.
def inference(instruction_prompt, input_prompt=''):

if input_prompt:
    template = f'''Below is an instruction that describes a task. Write a response that appropriately completes the request.

  ### Instruction:
  {instruction_prompt}

  ### Input:
  {input_prompt}

  ### Response:
  '''

  else:
    template = f'''Below is an instruction that describes a task. Write a response that appropriately completes the request.

  ### Instruction:
  {instruction_prompt}

  ### Response:
  '''

  inputs = tokenizer(
    template,
    return_tensors="pt",
  )
  input_ids = inputs["input_ids"].cuda()

  generation_config = GenerationConfig(
      temperature=0.6,
      top_p=0.95,
      repetition_penalty=1.15,
  )
  print("Generating...")
  generation_output = model.generate(
      input_ids=input_ids,
      generation_config=generation_config,
      return_dict_in_generate=True,
      output_scores=True,
      max_new_tokens=128,
  )

  result = ''.join([tokenizer.decode(s) for s in generation_output.sequences])
  result = result.partition('### Response:\n   ')[2]

  return result
Good, we are done! Let’s try this out. Here are some examples of results I got, training with only 2 epochs:
inference('Write a long story about a flying cat') The sky was dark and ominous as the wind howled through the trees, sending
them swaying back and forth in its wake. A small black kitten sat on top of
one of the branches, watching the storm with wide eyes. It had been raining
for days now, and the little feline was getting tired of being cooped up
inside all day. As it watched the rain pour down from above, it suddenly felt
inspired to take flight! With a mighty leap, the kitten soared into the air,
letting the wind carry it higher and higher until it reached the clouds.
inference('Extract cities as a list from this sentence: ', 'As a student studying abroad, I flew from New York City to Paris, where I spent a week before taking a train to Barcelona for a few days, and then continued my journey to Rome.') [New York City, Paris, Barcelona, Rome]
As you can see, we have very satisfying results!
By using an open-source model available on huggingface, some data, and a few optimization techniques, we successfully built our own ChatGPT-like model! Isn’t this crazy?
As you can imagine, there are plenty of potential applications. Also, keep in mind that there are more and more open-source LLMs. You can certainly find an alternative to LLaMA to build your own chatbot!
As a next step, you could try to integrate this into a streamlit application so that you can directly interact and chat with your model.
Congrats! You reached the end of this article. I hope you enjoyed reading it. Feel free to leave a comment and reach out!
References
[1] Meta AI, Introducing LLaMA: A foundational, 65-billion-parameter large language model February 24, 2023
[2] Edward J. Hu, Yelong Shen, Phillip Willis, and al., LoRA: Low-Rank Adaptation of Large Language Models
[3] code_your_own_ai, PEFT LoRA Explained in Detail — Fine-Tune your LLM on your local GPU
[4] Martin Thissen, Alpaca & LLaMA: Answering All Your Questions
[5] Rohan Taori, Ishaan Gulrajani, Tianyi Zang, and al., Alpaca: A Strong, Replicable Instruction-Following Model